

Do you know about all of QuickBooks Online's settings? What you're missing may be important.
Looking through all the settings available in QuickBooks Online is something like reading the owner's manual when you get a new car. You know you should do it, but you find yourself consulting it only when you encounter a problem.
Let's explore some that you may have missed.
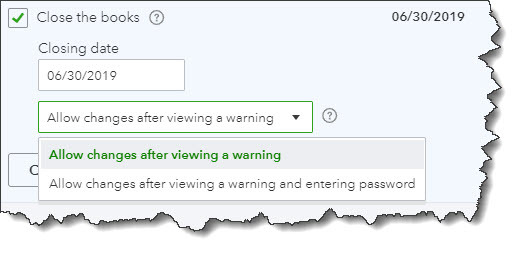
Closing the Books
Categories
QuickBooks Online offers a couple ways to categorize transactions so you can see related data in searches and reports. Scroll down to Categories and click on the Off button to the right of Track classes to turn this feature on. QuickBooks Online will then add a Class field to forms like invoices, along with a drop-down list that you can build with your own options. For example, you could create categories like departments, customer types, and product lines. You can choose to assign classes to entire transactions or to individual rows in them, and you can ask to be warned if you try to save a form without selecting a Class.
- Pre-fill forms with previously entered content. Once you've saved a transaction for a customer, vendor, or employee, you can choose to have QuickBooks Online complete some fields in the next form you create for them.
- Automatically apply credits. Do you want QuickBooks Online to apply credits to the next invoice you create for a given customer? Most businesses do, but a specific example of a time you wouldn't check the box would be if you're a property manager who requires security deposits.
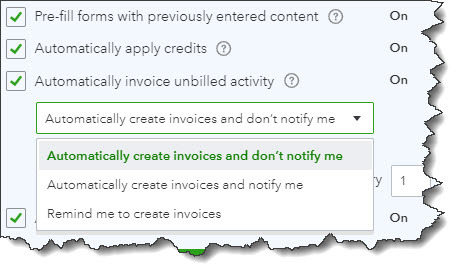
QuickBooks Online offers several automation options.
- Automatically invoice unbilled activity. Be careful with this one. When you have customers with unbilled activity, QuickBooks Online can automatically create invoices for them on a schedule you designate. You have a few options here. You can simply ask for a reminder as the date approaches, or you can allow the site to automatically create invoices - with or without notifying you.
- Automatically apply bill payments. When you record bill payments, QuickBooks Online can automatically apply them to the oldest recorded bill.
Time Tracking
Does your company sell services that are billed by the hour? If so, there are a couple of options you can turn on here. When you create timesheets or individual timed activities, you can add a Service field to the tracking form. You can also include a checkbox to indicate that a block of timed work is billable to customers. If you do the latter, you can opt in or out of letting users see the actual rate you're charging customers.
Checking Your Work
QuickBooks Online refers to these as Advanced Settings for a reason. Making the wrong choices on any of them could lead to unhappy or confused customers and/or inaccuracies in your accounting file. We think you should know about these options, but we also hope you'll schedule a consultation with us before attempting to set them up. It's always much easier to spot problems in the making than to correct mistakes already made.
.png "Untitled design (1)")
